Posts tagged ‘Image Correction’
How to Lighten up an Image
How to lighten up a dark photo
This very simple tutorial is based on Photoshop CS4. It will work on a CS3 and CS2 version as well.
A very easy and effective way to lighten up a dark photo is to use Shadows/Highlights! You will be surprised about the impact!
This exercise will explain in easy 3 Steps how to lighten up a dark photo:
- Use a dark photo or use our sample photo
- Use the Shadows/Highlights (Image Adjustments)
- Save file as a jpg
Step 1
 Either use a photo that you have and open it in Photoshop (Ctrl + O or File>Open)
Alternatively just use our sample photo. You can right click it and choose copy and when in Photoshop start a new document (Ctrl + N or File>New Document) and paste the image with Ctrl + V.
Step 2
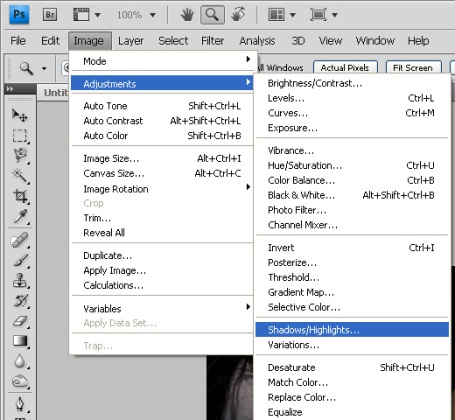
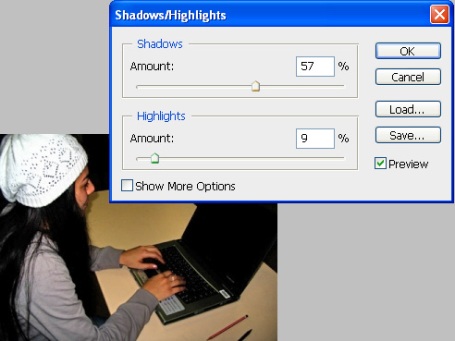
To actually lighten the image up go to Image>Adjustments>Shadows/Highlights and change the amounts of the Shadows (I chose 57%) and Highlights (I chose 9%). If you untick and tick the Preview box you can see the changes that will happen.
Okay the changes!


Step 3
Save the image as a jpg (Ctrl + S or File>Save).
Image Correction With Levels
How to lighten up a dark photo using Levels
This exercise is good if you need to lighten up a dark photo. Just follow the steps below to do this simple task. You will learn how to:
- Copy and paste an image
- Adjust the Levels
- Save a file as a JPEG
- Use Auto Levels
Step 1 – Copy and paste image
Right click on the under exposed image and select copy. Go to Photoshop page and select Ctrl+n (or select file/new document from the drop down menu). Press enter on the new document panel, paste the image into the new window by pressing Ctrl+V.
Step 2 – Adjust Levels
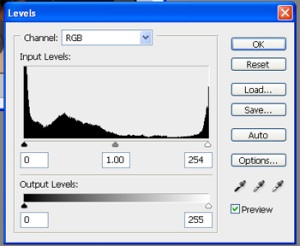
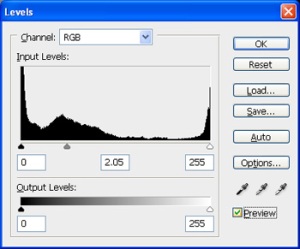
Choose image > Adjustment > Levels. To reduce the tonal range of the photograph to a more ideal range, drag the middle slider toward the left where the histogram begins to climb. This will force those shades of black to lighter values while still retaining the lighter tones on the right side of the histogram.
Step 3 – Save Image
Choose File > Save > As JPEG.

Step 4 – Alternative Step:
A quick way to adjust the levels of an image is using Auto-Levels:
Choose image > Adjustment > Auto Levels (or short cut: Ctrl+Shft+L)
The results are amazing!


